

Here's some easy to follow ideas from a library restoration site:
Step 1: Preparing the Text-block:

Often the text-block is solidly stitched and only needs old glue and paper scraped off, and a new layer of glue along the spine. Care should be taken not to cut or break the stitching.
If you are starting with loose sheets, the following procedure called "double-fan binding" will be helpful:
Gluing up the spine
- Jog the textblock edges on your work surface to even up all the pages. You’ll need to keep the textblock together while you glue the spine. To do this you can
- put it in a finishing press, spine end up, with about 1/3 of it sticking out. You can make a simple finishing press using these directions.
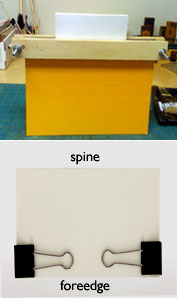
 If you don’t have a finishing press, attach binder clips to the head and tail of the textblock edge. Either stand the block up, balanced on the open binder clips, or lay the textblock on the work surface with the spine extended out over the edge of the table, weighted so that it won’t move while you glue.
- Fan the pages over to one side. The textblock should be fanned evenly so all the pages are ever-so-slightly exposed. Work glue (undiluted PVA) onto the surface with a brush or a small sponge paint roller.
- Fan the pages the other way and brush on the glue again.
- With the textblock upright, squeeze the spine between your fingers to remove any excess glue. Smooth the spine with your finger. Let the glue set up for a few minutes.

- Take the textblock out of the press, wrap it in waxed paper, put it under weight and let it dry.
Step 2: Gluing on Endsheets:
End papers, or what are sometimes called the "fly-leaves" of a book, are important and should always be of paper similar to that of the book, and used so the grain of the paper runs lengthwise. With a large steel square, get a square corner, measuring from this four sheets one-half inch longer and one inch wider than an open sheet of the book. Mark each of the four corners with a cross, and cut the edges with a knife, along the lines formed by the square. Paste an inch wide strip of book linen on to form a "tip" or guard as in the guest book, but unlined.
When the end papers are made and laid in the position on the ends of the book, tip out, with the corner marked X at the top, the book is ready to be put in press. After the "head" is cut by hand, the "fore-edge" and "tail" or bottom may also be cut by hand, but it is a tiresome process, and can be done better on a cutting machine in a bindery.
This requires folded endsheets (also called paste-downs) which are twice the size of the book-page, with the fold placed at the back toward the spine. They should be glued using a rub-on contact cement (so as not to warp pages), either along the back edge (in case printing would be covered up) or over the whole area (if the front-page of the text-block is blank).
Step 3: Gluing on the hinge-cloth:
The Cloth hinge should be some non-stretch, stiff cotton or linen cloth, strong but not prone to distortion. This will be the item (when glued later to the stiff outer boards) that holds on the covers and gives strength to the hinges. It should extend almost to the top and bottom of the text block, and should overlap the endsheets (now glued onto the textblock) by an inch or two.
 |
| Step 3: Adding a hinge-cloth |
 |
| Step 4: Glue on stiff cover-board |
 |
| Step 5: Glue on final Spine Cloth (or leather) |
Most periodicals produced today are not in signature form and cannot be sewn through the section folds. The only practical way to avoid inflexible, through-the-surface sewing methods is through the use of double-fan adhesive binding, in which single leaves are fanned mechanically in both directions, and an adhesive line of 0.5 millimeters is applied between each leaf. Owing to the cost of the machinery required, commercial binders in developing countries often fan leaves by hand.
The appropriate binding for adhesive structures is a flat-backed, flush construction, with binders' boards glued directly onto the outside of the endpapers about 1 centimeter from the back edge. The backbone is lined with kraft or wrapping paper, and a piece of pre-lettered book cloth is glued directly on top of the backbone extending approximately 6 centimeters onto the boards. The bound volume is lightly trimmed to level the edges.
This form of binding is inexpensive and dimensionally stable (it cannot sag on the shelf). Periodicals may be bound in the library with minimal equipment and easily opened.

No comments:
Post a Comment